Resources Monitor
The Resource Monitor provides the dispatch operator with an interactive real-time situational awareness (SA) view of all available resource statuses in any given area. The Resources Monitor enables you to obtain details of all the geo-based entities of the system:
- Incidents
- Responders
- Reporters
- Units
- Assets
- POIs
- Geo-based alerts
The Resources Monitor is modular, dynamic and interacts with the map enabling the dispatch operator to choose the areas and type of resources on which to focus.
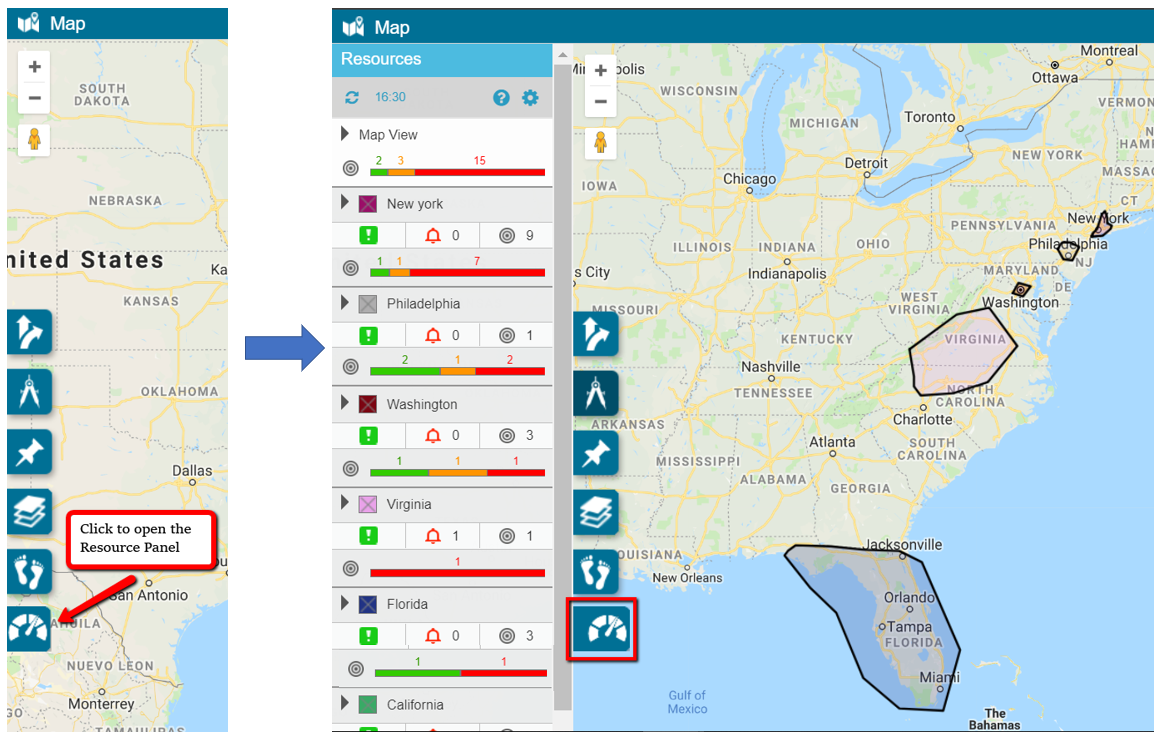
Click the Resources Monitor button on the map's vertical toolbar to open the in-map Resources Monitor.
The Resources Monitor includes the following elements:
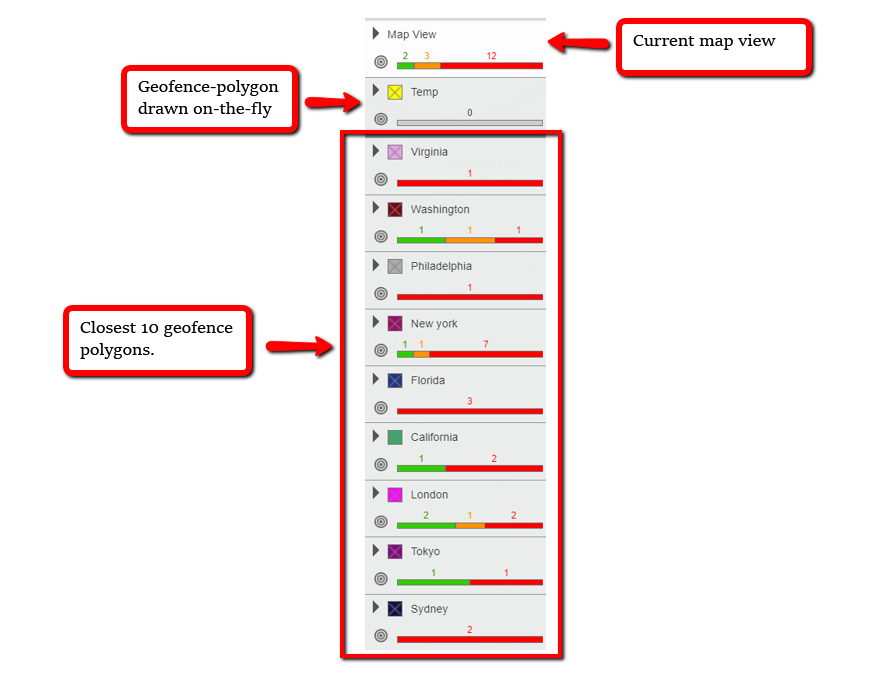
- An in-map display panel showing the numbers of incidents, alerts and available resources in the ten closest geofence polygons.
- A panel displaying the number of incidents, alerts and available resources in the current map view.
- A panel displaying the number of incidents, alerts and available resources in a geofence-polygon drawn on-the-fly.
-
A panel displaying the current aggregate statuses of the following resource types: responders, reporters, assets and incidents.

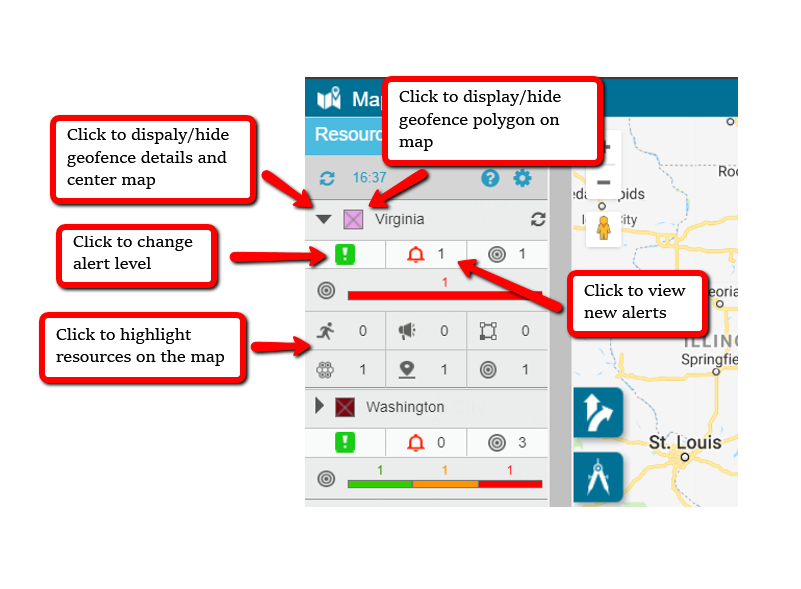
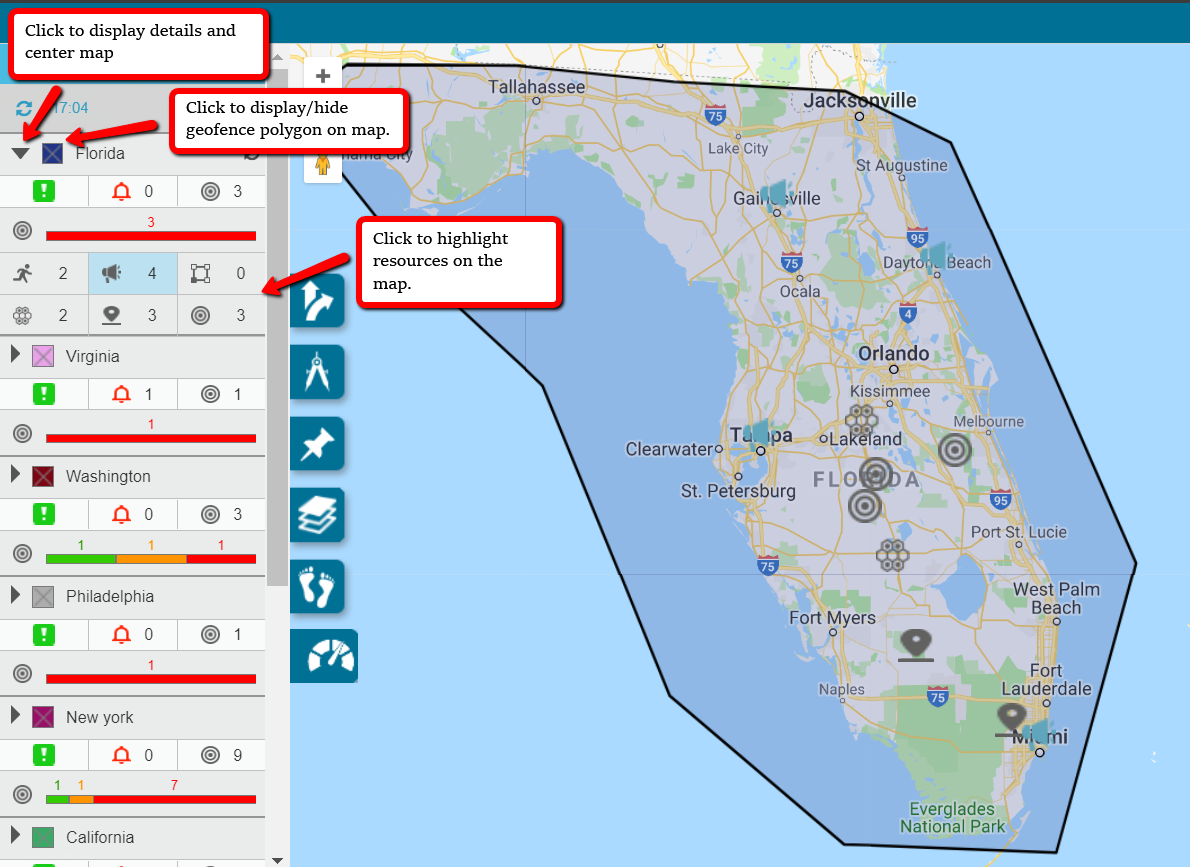
Click an icon in the Resources Monitor panel to display/hide more details of the respective resources.
Resources Monitor Settings
Click Settings in the Resources Monitor to open the Settings panel.
The Resources Monitor setting panel enables you to define the following settings:
Geofence (Polygons) Settings
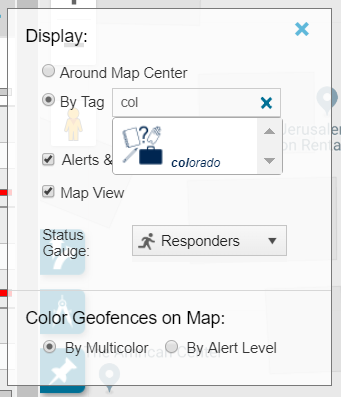
You can choose which polygons to display:
- Around Map Center: Displays ten geofence polygons whose polygon centers are closest to the center of the map view. Moving the map and clicking the Refresh button updates the Resources Monitor panel and display a new list of the ten closest geofences.
- By Tag:-Displays up to ten geofence polygons based on the tag you choose and the geofence polygons' tags.
Very large polygons that are partially visible on the current map-view may not appear on the Resources Monitor list as their center is more distant than the center of a small polygon which may not be visible on the current map-view.
Other Settings
You can configure the following other settings:
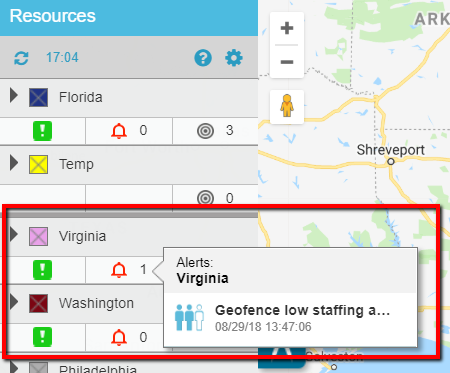
- Alerts & Incidents: Displays/hides the current alert status for each of the ten closest geofence polygons. Click the Alert status to open a tooltip that enables you to toggle the alert levels.
- Status Gauge: Defines the resource type (responders, reporters, assets, incidents) displayed on the Resource Monitor gauges. See the chart below for the color code behavior of the Resource Status gauge.
- Map View: Adds another section to the Resource Monitor that displays the resources available on the current map view (regardless of any geofence polygon in the area).
- Color Geofences on Map: Defines the color scheme of geofences in the map: Multicolor: Use colors defined in geofence settingsAlert Level: Use colors defined by the alert level in each geofence (Red=high, Orange=medium, Green=low)
Interactions between the Resources Monitor and the Map
You can perform the following interactions with the map from the Resources Monitor
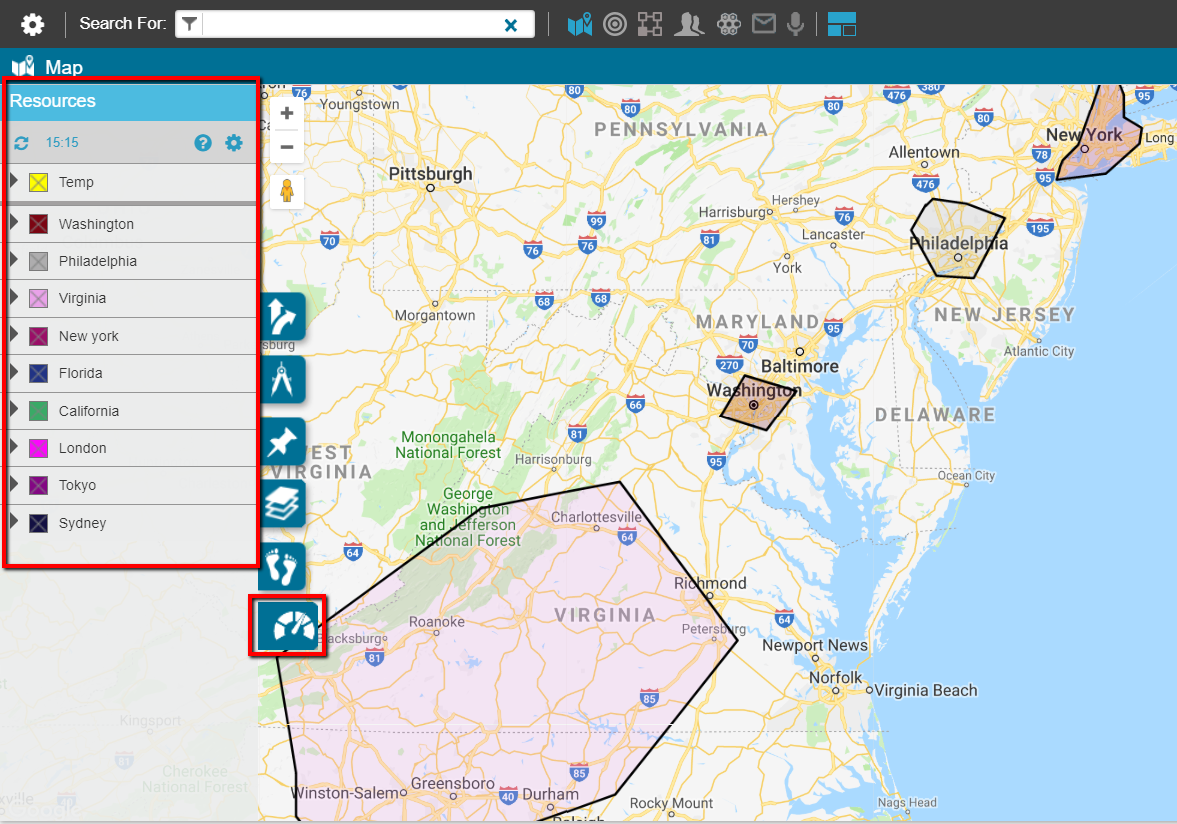
- Expand the geofence display details to center geofence polygon on the map.
- Toggle to display/hide the geofence polygon on the map.
- Click a a specific resource type, to highlight those resources on the map.
Aggregate Gauge Behavior
The following table shows the meaning of the different colors in the Resource Monitor status gauge that differ according to the resource type:
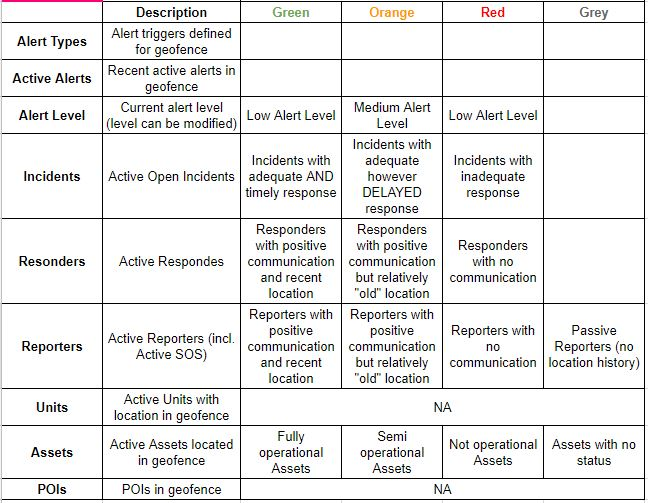
New or old locations are defined in the system configuration page. New location means the users' locations do not exceed the green location threshold.

No Communication is defined in the system configuration page. No Com means that the most recent communication between the server and the user's app exceeds the threshold defined in the system configuration.
Drawing Temporary Geofence Polygons
This powerful function in the Resource Monitor enables you to draw a geofence polygon on-the-fly and instantly retrieve the current status of all the resources in the temporary geofence.
Clicking Draw Geofence in the map toolbar opens the draw geofence toolkit. Select circle, rectangle or polygon and draw a geofence on the map.
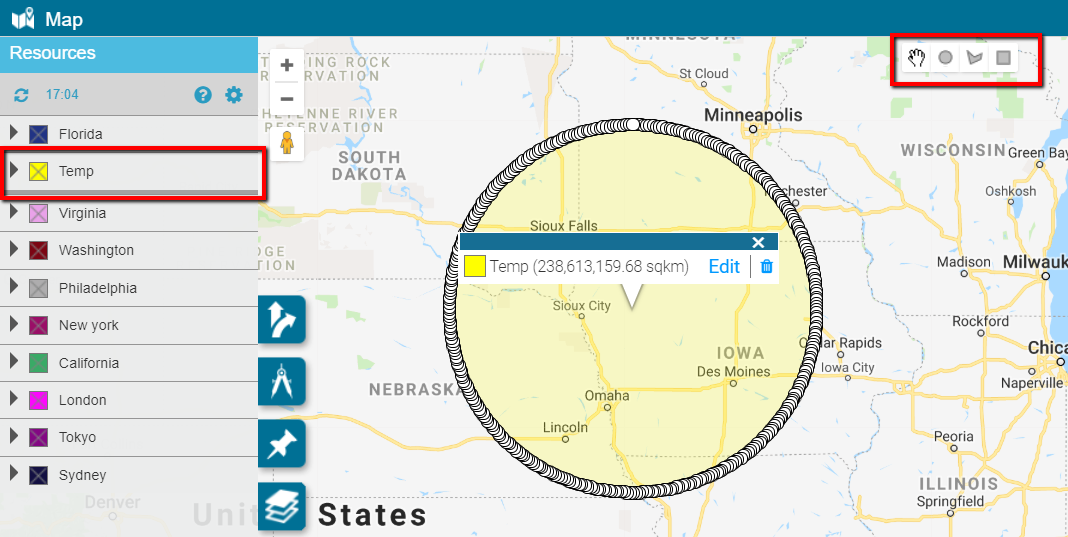
Temporary geofence polygons are saved for 24 hours, and are the automatically deleted.
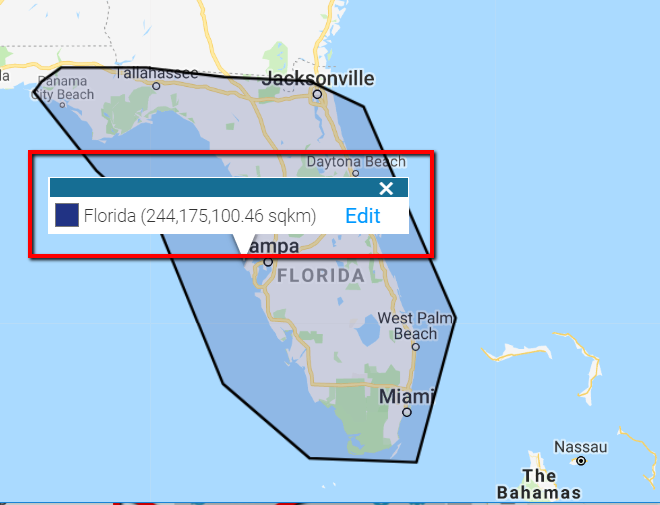
Geofence Tooltip
Click on a geofence polygon to display a tooltip that includes the following options:
- Name of geofence (the default is Temp).
- The area of the temporary geofence in square miles.
- An Edit button that enables you to adjust the geofence area and give a name to the geofence.
- A Delete button to erase the temporary geofence.
Geofence Alerts
You can define the following geofence alerts:
- Geofence Entrance Alert
- Geofence Exit Alert
- Geofence Low Staffing Alert
- Geofence Absence Alert
The number of alerts activated for a specific geofence polygon is displayed in the alerts cell (Bell icon). Click the number to display a tooltip with the alert details.